Lesson 4: Functions


Now that you should have learned about variables, loops, and conditional statements it is time to learn about functions. You should have an idea of their uses as we have already used them and defined one in the guise of main. cin.get() is an example of a function. In general, functions are blocks of code that perform a number of pre-defined commands to accomplish something productive. 


Functions that a programmer writes will generally require a prototype. Just like a blueprint, the prototype tells the compiler what the function will return, what the function will be called, as well as what arguments the function can be passed. When I say that the function returns a value, I mean that the function can be used in the same manner as a variable would be. For example, a variable can be set equal to a function that returns a value between zero and four. 

For example:
 
#include <cstdlib>   // Include rand()

using namespace std; // Make rand() visible

int a = rand(); // rand is a standard function that all compilers have
Do not think that 'a' will change at random, it will be set to the value returned when the function is called, but it will not change again. 

The general format for a prototype is simple:
 
return-type function_name ( arg_type arg1, ..., arg_type argN ); 
arg_type just means the type for each argument -- for instance, an int, a float, or a char. It's exactly the same thing as what you would put if you were declaring a variable.

There can be more than one argument passed to a function or none at all (where the parentheses are empty), and it does not have to return a value. Functions that do not return values have a return type of void. Let's look at a function prototype:
 
int mult ( int x, int y );
This prototype specifies that the function mult will accept two arguments, both integers, and that it will return an integer. Do not forget the trailing semi-colon. Without it, the compiler will probably think that you are trying to write the actual definition of the function. 

When the programmer actually defines the function, it will begin with the prototype, minus the semi-colon. Then there should always be a block with the code that the function is to execute, just as you would write it for the main function. Any of the arguments passed to the function can be used as if they were declared in the block. Finally, end it all with a cherry and a closing brace. Okay, maybe not a cherry. 

Let's look at an example program:
 
#include <iostream>

using namespace std;

int mult ( int x, int y );

int main()
{
  int x;
  int y;
  
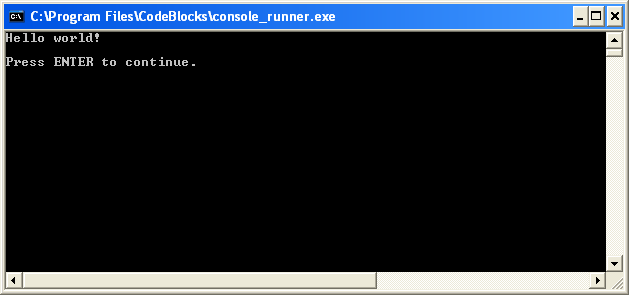
  cout<<"Please input two numbers to be multiplied: ";
  cin>> x >> y;
  cin.ignore();
  cout<<"The product of your two numbers is "<< mult ( x, y ) <<"\n";
  cin.get();
}

int mult ( int x, int y )
{
  return x * y;
}
This program begins with the only necessary include file and a directive to make the std namespace visible. Everything in the standard headers is inside of the std namespace and not visible to our programs unless we make them so. Next is the prototype of the function. Notice that it has the final semi-colon! The main function returns an integer, which you should always have to conform to the standard. You should not have trouble understanding the input and output functions. It is fine to use cin to input to variables as the program does. But when typing in the numbers, be sure to separate them by a space so that cin can tell them apart and put them in the right variables. 

Notice how cout actually outputs what appears to be the mult function. What is really happening is cout is printing the value returned by mult, not mult itself. The result would be the same as if we had use this print instead
 
cout<<"The product of your two numbers is "<< x * y <<"\n";
The mult function is actually defined below main. Due to its prototype being above main, the compiler still recognizes it as being defined, and so the compiler will not give an error about mult being undefined. As long as the prototype is present, a function can be used even if there is no definition. However, the code cannot be run without a definition even though it will compile. The prototype and definition can be combined into one also. If mult were defined before it is used, we could do away with the prototype because the definition can act as a prototype as well. 

Return is the keyword used to force the function to return a value. Note that it is possible to have a function that returns no value. If a function returns void, the return statement is valid, but only if it does not have an expression. In other words, for a function that returns void, the statement "return;" is legal, but redundant. 

The most important functional (Pun semi-intended) question is why do we need a function? Functions have many uses. For example, a programmer may have a block of code that he has repeated forty times throughout the program. A function to execute that code would save a great deal of space, and it would also make the program more readable. Also, having only one copy of the code makes it easier to make changes. Would you rather make forty little changes scattered all throughout a potentially large program, or one change to the function body? So would I. 

Another reason for functions is to break down a complex program into logical parts. For example, take a menu program that runs complex code when a menu choice is selected. The program would probably best be served by making functions for each of the actual menu choices, and then breaking down the complex tasks into smaller, more manageable tasks, which could be in their own functions. In this way, a program can be designed that makes sense when read. And has a structure that is easier to understand quickly. The worst programs usually only have the required function, main, and fill it with pages of jumbled code. 

Previous: Loops
Next: Switch/case 
Back to the tutorial index


Lesson 3: Loops


Loops are used to repeat a block of code. Being able to have your program repeatedly execute a block of code is one of the most basic but useful tasks in programming -- many programs or websites that produce extremely complex output (such as a message board) are really only executing a single task many times. (They may be executing a small number of tasks, but in principle, to produce a list of messages only requires repeating the operation of reading in some data and displaying it.) Now, think about what this means: a loop lets you write a very simple statement to produce a significantly greater result simply by repetition.

One Caveat: before going further, you should understand the concept of C++'s true and false, because it will be necessary when working with loops (the conditions are the same as with if statements). There are three types of loops: for, while, and do..while. Each of them has their specific uses. They are all outlined below. 

FOR - for loops are the most useful type. The syntax for a for loop is 

 
for ( variable initialization; condition; variable update ) {
  Code to execute while the condition is true
}
The variable initialization allows you to either declare a variable and give it a value or give a value to an already existing variable. Second, the condition tells the program that while the conditional expression is true the loop should continue to repeat itself. The variable update section is the easiest way for a for loop to handle changing of the variable. It is possible to do things like x++, x = x + 10, or even x = random ( 5 ), and if you really wanted to, you could call other functions that do nothing to the variable but still have a useful effect on the code. Notice that a semicolon separates each of these sections, that is important. Also note that every single one of the sections may be empty, though the semicolons still have to be there. If the condition is empty, it is evaluated as true and the loop will repeat until something else stops it. 

Example:
 
#include <iostream>

using namespace std; // So the program can see cout and endl

int main()
{
  // The loop goes while x < 10, and x increases by one every loop
  for ( int x = 0; x < 10; x++ ) {
    // Keep in mind that the loop condition checks 
    //  the conditional statement before it loops again.
    //  consequently, when x equals 10 the loop breaks.
    // x is updated before the condition is checked.    
    cout<< x <<endl;
  }
  cin.get();
}
This program is a very simple example of a for loop. x is set to zero, while x is less than 10 it calls cout<< x <<endl; and it adds 1 to x until the condition is met. Keep in mind also that the variable is incremented after the code in the loop is run for the first time. 

WHILE - WHILE loops are very simple. The basic structure is 

while ( condition ) { Code to execute while the condition is true } The true represents a boolean expression which could be x == 1 or while ( x != 7 ) (x does not equal 7). It can be any combination of boolean statements that are legal. Even, (while x ==5 || v == 7) which says execute the code while x equals five or while v equals 7. Notice that a while loop is the same as a for loop without the initialization and update sections. However, an empty condition is not legal for a while loop as it is with a for loop. 

Example:
 
#include <iostream>

using namespace std; // So we can see cout and endl

int main()
{ 
  int x = 0;  // Don't forget to declare variables
  
  while ( x < 10 ) { // While x is less than 10 
    cout<< x <<endl;
    x++;             // Update x so the condition can be met eventually
  }
  cin.get();
}
This was another simple example, but it is longer than the above FOR loop. The easiest way to think of the loop is that when it reaches the brace at the end it jumps back up to the beginning of the loop, which checks the condition again and decides whether to repeat the block another time, or stop and move to the next statement after the block. 

DO..WHILE - DO..WHILE loops are useful for things that want to loop at least once. The structure is
 
do {
} while ( condition );
Notice that the condition is tested at the end of the block instead of the beginning, so the block will be executed at least once. If the condition is true, we jump back to the beginning of the block and execute it again. A do..while loop is basically a reversed while loop. A while loop says "Loop while the condition is true, and execute this block of code", a do..while loop says "Execute this block of code, and loop while the condition is true". 

Example:
 
#include <iostream>

using namespace std;

int main()
{
  int x;

  x = 0;
  do {
    // "Hello, world!" is printed at least one time
    //  even though the condition is false
    cout<<"Hello, world!\n";
  } while ( x != 0 );
  cin.get();
}
Keep in mind that you must include a trailing semi-colon after the while in the above example. A common error is to forget that a do..while loop must be terminated with a semicolon (the other loops should not be terminated with a semicolon, adding to the confusion). Notice that this loop will execute once, because it automatically executes before checking the condition. 

Previous: If Statements
Next: Functions 
Back to the tutorial index

'프로그래밍 > C, C++' 카테고리의 다른 글

레슨 5: switch case in C and C++  (0) 2011.06.07
레슨 4: Functions  (0) 2011.06.07
레슨 2 : If statements (if,else문)  (0) 2011.06.07
Setting Up Code::Blocks and the MINGW Compiler on Windows  (0) 2011.06.07
C++ Programming HOW-TO  (0) 2011.06.06


Lesson 2: If statements


The ability to control the flow of your program, letting it make decisions on what code to execute, is valuable to the programmer. The if statement allows you to control if a program enters a section of code or not based on whether a given condition is true or false. One of the important functions of the if statement is that it allows the program to select an action based upon the user's input. For example, by using an if statement to check a user entered password, your program can decide whether a user is allowed access to the program. 

Without a conditional statement such as the if statement, programs would run almost the exact same way every time. If statements allow the flow of the program to be changed, and so they allow algorithms and more interesting code. 

Before discussing the actual structure of the if statement, let us examine the meaning of TRUE and FALSE in computer terminology. A true statement is one that evaluates to a nonzero number. A false statement evaluates to zero. When you perform comparison with the relational operators, the operator will return 1 if the comparison is true, or 0 if the comparison is false. For example, the check 0 == 2 evaluates to 0. The check 2 == 2 evaluates to a 1. If this confuses you, try to use a cout statement to output the result of those various comparisons (for example cout<< ( 2 == 1 );) 

When programming, the aim of the program will often require the checking of one value stored by a variable against another value to determine whether one is larger, smaller, or equal to the other. 

There are a number of operators that allow these checks. 

Here are the relational operators, as they are known, along with examples:
 
>     greater than              5 > 4 is TRUE
<     less than                 4 < 5 is TRUE
>=    greater than or equal     4 >= 4 is TRUE
<=    less than or equal        3 <= 4 is TRUE
==    equal to                  5 == 5 is TRUE
!=    not equal to              5 != 4 is TRUE
It is highly probable that you have seen these before, probably with slightly different symbols. They should not present any hindrance to understanding. Now that you understand TRUE and FALSE in computer terminology as well as the comparison operators, let us look at the actual structure of if statements.

Basic If Syntax

The structure of an if statement is as follows:
 
if ( TRUE )
  Execute the next statement
Here is a simple example that shows the syntax:
if ( 5 < 10 )
  cout<<"Five is now less than ten, that's a big surprise";
Here, we're just evaluating the statement, "is five less than ten", to see if it is true or not; with any luck, it's not! If you want, you can write your own full program including iostream and put this in the main function and run it to test. 

To have more than one statement execute after an if statement that evaluates to true, use braces, like we did with the body of a function. Anything inside braces is called a compound statement, or a block. 

For example:
 
if ( TRUE ) {
  Execute all statements inside the braces
}
I recommend always putting braces following if statements. If you do this, you never have to remember to put them in when you want more than one statement to be executed, and you make the body of the if statement more visually clear.

Else

Sometimes when the condition in an if statement evaluates to false, it would be nice to execute some code instead of the code executed when the statement evaluates to true. The "else" statement effectively says that whatever code after it (whether a single line or code between brackets) is executed if the if statement is FALSE. 

It can look like this:
 
if ( TRUE ) {
  // Execute these statements if TRUE
}
else {
  // Execute these statements if FALSE
}

Else If

Another use of else is when there are multiple conditional statements that may all evaluate to true, yet you want only one if statement's body to execute. You can use an "else if" statement following an if statement and its body; that way, if the first statement is true, the "else if" will be ignored, but if the if statement is false, it will then check the condition for the else if statement. If the if statement was true the else statement will not be checked. It is possible to use numerous else if statements to ensure that only one block of code is executed.
if ( <condition> ) {
  // Execute these statements if <condition> is TRUE
}
else if ( <another condition> ) {
  // Execute these statements if <another condition> is TRUE and
  // <condition> is FALSE
}


Let's look at a simple program for you to try out on your own.
 
#include <iostream>	

using namespace std;
		
int main()                            // Most important part of the program!
{
  int age;                            // Need a variable...
  
  cout<<"Please input your age: ";    // Asks for age
  cin>> age;                          // The input is put in age
  cin.ignore();                       // Throw away enter
  if ( age < 100 ) {                  // If the age is less than 100
     cout<<"You are pretty young!\n"; // Just to show you it works...
  }
  else if ( age == 100 ) {            // I use else just to show an example 
     cout<<"You are old\n";           // Just to show you it works...
  }
  else {
    cout<<"You are really old\n";     // Executed if no other statement is
  }
  cin.get();
}

More interesting conditions using boolean operators

Boolean operators allow you to create more complex conditional statements. For example, if you wish to check if a variable is both greater than five and less than ten, you could use the boolean AND to ensure both var > 5 and var < 10 are true. In the following discussion of boolean operators, I will capitalize the boolean operators in order to distinguish them from normal English. The actual C++ operators of equivalent function will be described further into the tutorial - the C++ symbols are not: OR, AND, NOT, although they are of equivalent function. 

When using if statements, you will often wish to check multiple different conditions. You must understand the Boolean operators OR, NOT, and AND. The boolean operators function in a similar way to the comparison operators: each returns 0 if evaluates to FALSE or 1 if it evaluates to TRUE. 

NOT: The NOT operator accepts one input. If that input is TRUE, it returns FALSE, and if that input is FALSE, it returns TRUE. For example, NOT (1) evaluates to 0, and NOT (0) evaluates to 1. NOT (any number but zero) evaluates to 0. In C and C++ NOT is written as !. NOT is evaluated prior to both AND and OR. 

AND: This is another important command. AND returns TRUE if both inputs are TRUE (if 'this' AND 'that' are true). (1) AND (0) would evaluate to zero because one of the inputs is false (both must be TRUE for it to evaluate to TRUE). (1) AND (1) evaluates to 1. (any number but 0) AND (0) evaluates to 0. The AND operator is written && in C++. Do not be confused by thinking it checks equality between numbers: it does not. Keep in mind that the AND operator is evaluated before the OR operator. 

OR: Very useful is the OR statement! If either (or both) of the two values it checks are TRUE then it returns TRUE. For example, (1) OR (0) evaluates to 1. (0) OR (0) evaluates to 0. The OR is written as || in C++. Those are the pipe characters. On your keyboard, they may look like a stretched colon. On my computer the pipe shares its key with \. Keep in mind that OR will be evaluated after AND. 

It is possible to combine several boolean operators in a single statement; often you will find doing so to be of great value when creating complex expressions for if statements. What is !(1 && 0)? Of course, it would be TRUE. It is true is because 1 && 0 evaluates to 0 and !0 evaluates to TRUE (ie, 1). 

Try some of these - they're not too hard. If you have questions about them, feel free to stop by our forums.
 
A. !( 1 || 0 )         ANSWER: 0	
B. !( 1 || 1 && 0 )    ANSWER: 0 (AND is evaluated before OR)
C. !( ( 1 || 0 ) && 0 )  ANSWER: 1 (Parenthesis are useful)
If you find you enjoyed this section, then you might want to look more at Boolean Algebra. 

Previous: The Basics
Next: Loops 
Back to the tutorial index

'프로그래밍 > C, C++' 카테고리의 다른 글

레슨 4: Functions  (0) 2011.06.07
레슨 3: Loops  (0) 2011.06.07
Setting Up Code::Blocks and the MINGW Compiler on Windows  (0) 2011.06.07
C++ Programming HOW-TO  (0) 2011.06.06
gcc 옵션!  (1) 2011.06.06

Setting Up Code::Blocks and the MINGW Compiler on Windows

By Thomas Carriero 

This tutorial gives you detailed instructions for setting up a compiler (the MINGW compiler), a tool that will let you turn the code that you write into programs, and Code::Blocks, a free development environment for C and C++. This tutorial explains how to install Code::Blocks on Windows 2000, XP, Vista or Windows 7.

Step 1: Download Code::Blocks

  • Go to this website: http://www.codeblocks.org/downloads
  • Follow the link to "Download the binary release" (direct link)
  • Go to the Windows 2000 / XP / Vista / 7 section
  • Look for the file that includes mingw in the name. (The name as of this writing was codeblocks-10.05mingw-setup.exe; the 10.05 may be different).
  • Save the file to your desktop. It is roughly 74 megabytes.Step 2: Install Code::Blocks
  • Double click the installer.
  • Hit next several times. Other setup tutorials will assume you have installed in C:\Program Files\CodeBlocks (the default install location), but you may install elsewhere if you like
  • Do a Full Installation
  • Launch Code::Blocks

Step 3: Running in Code::Blocks

You will be prompted with a Compilers auto-detection window: 


When you get the compiler auto-detection window, just hit OK. Code::Blocks may ask if you want to associate it as the default viewer for C/C++ files--I'd suggest you do. Click on the File menu, and under "New", select "Project..." 

The following window will come up: 

New Project Window 

Click on "Console Application" and hit the "Go" button. 

Click next until you get to the Language Selection Dialog: 

Language selection dialog 

You'll be asked to choose whether you want to use C or C++. If you're not sure, use C++. Otherwise, choose based on the language you are learning. (You can find tutorials here on both C and C++.) 

After clicking "Next", Code::Blocks will then prompt you with where you'd like to save the console application: 

Project Name and Location 

I'd recommend you put it in its own folder, as it may create several files (this is especially true if you create other types of projects). You will need to give your project a name, anything will be fine. 

Clicking "Next" again will prompt you to set up your compiler: 

Compiler Setup 

You don't need to do anything here. Just accept the defaults by hitting "Finish". 

You can now open the main.cpp file on the left: 

Main Editor View(You may need to expand the contents of the "Sources" folder if you don't see main.cpp.) 

At this point, you will have your main.cpp file, which you can modify if you like. For now, it just says "Hello World!", so we can run it as is. Hit F9, which will first compile it and then run it. 

Running Program 

You now have a running program! You can simply edit main.cpp and then hit F9 to compile it and run it again. 

Now that you've finished setting your compiler up, it's time to learn to program: Intro to C++ (or if you're learning C, Intro to C).

'프로그래밍 > C, C++' 카테고리의 다른 글

레슨 4: Functions  (0) 2011.06.07
레슨 3: Loops  (0) 2011.06.07
레슨 2 : If statements (if,else문)  (0) 2011.06.07
C++ Programming HOW-TO  (0) 2011.06.06
gcc 옵션!  (1) 2011.06.06

+ Recent posts